고정 헤더 영역
상세 컨텐츠
본문

------------------------------------------------------------------------------------------------------------
1. ES6 클래스 vs TS Class 기본비교 : 코드펜 에서 실습 https://codepen.io/pen/
------------------------------------------------------------------------------------------------------------
#1) ES6부터 클래스 문법을 사용할 수 있다. 클래스를 정의하고, 속성을 설정하는 기본 사용법은 다음과 같다.(아래)
/* 클래스 기본서식 ------------------------------------------------ */
class Book {
  // 생성자 함수 : 인스턴스=객체의 데이터와 함수를 초기화 하는 기능으로 사용된다.
  constructor(title, author, pages) {
    this.title  = title;
    this.author = author;
    this.pages  = pages;
    this.init();
  }
  // 인스턴스 메서드 : 클래스의 함수를 초기화 하는 기능으로 사용된다.
  init(){}
}
/* 인스턴스=객체 생성 ------------------------------------------------ */
let bookInfo = new Book('홍길동전', '허균', 300);
console.log(bookInfo); // Object 객체 출력
- 위 ES6코드 작업결과(아래)

#2) TS 클래스 : 위 ES6코드에 TS-타입스크립트용 접근 제어자 public, private, protected 예약어 추가
- 스택비즈의 TS 로 실습한다 https://stackblitz.com/fork/typescript (아래)
// Import stylesheets
import './style.css';

/* 클래스 기본서식 ------------------------------------------------ */
class Book {
  // TS에서는 접근 제어자를 사용하여 클래스 외부에 노출할 변수와 함수를 제어가능 : public, private, protected
  public title: string; // public: 클래스 외부에서 접근 가능
  author: string; // public은 기본 값으로 생략 가능하다.
  public pages: number; // 보통 개발자들은 _로 시작하는 변수를 private변수명으로 사용한다.
  private _plant: string = '서울 공장'; // private: Book 클래스 내부에서만 접근 가능
  protected _paper_type: string = '막종이'; // protected: Book 클래스를 포함한 서브 클래스에서만 접근 가능
  // 생성자 함수 : 인스턴스=객체의 데이터와 함수를 초기화 하는 기능으로 사용된다.
  constructor(title: string, author: string, pages: number) {
    this.init(); // 변수 initialize 초기화 함수를 상단으로 이동
    // TS용 타입코드 추가
    this.title = title;
    this.author = author;
    this.pages = pages;
  }
  // 인스턴스 메서드 : 클래스의 함수를 초기화 하는 기능으로 사용된다.
  init() {
    this.pages = 0;
  }
  /* 메서드 시작 ------------------------------------------------ */
  // public 메서드 : 클래스 외부에서 접근 가능(아래)
  public printPages(): string {
    return `${this.pages}페이지`;
  }
  // protected 메서드 : Book 클래스를 포함한 서브 클래스에서만 접근 가능(아래)
  protected _changePaperType(type: string): void {
    this._paper_type = type;
    // 밍크지 일 때는 페이지량이 30페이지를 증가되는 로직을 추가한다.
    if (type == '밍크지') {
      this.pages = this.pages + 30;
    }
  }
  // private 메서드 : Book 클래스 내부에서만 접근 가능(아래) 보통 개발자들은 _로 시작하는 함수를 private함수명으로 사용한다.
  private _changePlant(plant: string): void {
    this._plant = plant;
  }
  // 클래스 내부에서 protected 메서드 접근 가능(아래)
  public setPaperType(type: string): void {
    this._changePaperType(type);
  }
  // 클래스 내부에서 private 메서드 접근 가능(아래)
  public setPlant(plant: string): void {
    this._changePlant(plant);
  }
} //Book 클래스 End
/* 인스턴스=객체 생성 ------------------------------------------------ */
let bookInfo = new Book('홍길동전', '허균', 300);
console.log(bookInfo); // Object 객체 출력
// TS 코드용 결과 출력(아래)
console.log(bookInfo.printPages()); // '300페이지'
// 문제, 아래 접근 제어자 오류를 Book클래스의 public함수를 사용하여 해결해 보세요(아래)
bookInfo._changePaperType('밍크지');
console.log(bookInfo.printPages()); // '330페이지'
bookInfo._changePlant('지방 공장');
console.log(bookInfo); // Object 객체 출력
// Write TypeScript code!
const appDiv: HTMLElement = document.getElementById('app');
appDiv.innerHTML = `<h1>TypeScript Starter</h1>`;
- 위 TS코드에서 접근제어자 오류부분 _changePaperType 과 _changePlant부분을 처리해 보세요(아래 붉은색 밑줄부분)
#3) 서브(자식) 클래스로 클래스 확장 : extends 키워드(예약어) 사용
```
일반적으로 수퍼(부모) 클래스를 상속받은 서브(자식) 클래스는 수퍼 클래스의 기능에 더하여 좀 더 많은 기능을 갖도록 설계할 수 있다. constructor()를 사용해 상속 받은 수퍼 클래스의 생성자를 서브 클래스의 생성자로 확장할 수 있다. 이 때 반드시 super()를 사용해 수퍼 클래스의 생성자에 요구되는 인자를 전달해야 한다.(아래 코드에서 확인)
```
- 상단의 TS코드에서 접근제어자 소스에 아래 서브 클래스 코드 추가
/* 서브(자식) 클래스 생성 (아래)------------------------------------------------ */
class E_Book extends Book {
  constructor( // 수퍼(부모) 클래스의 생성자 함수 확장(재) 정의
    title:string,
    author:string,
    pages:number,
    public is_downloadable:boolean // E_Boot용으로 추가한 확장변수
  ){
    super(title, author, pages);// 수퍼(부모) 클래스의 변수를 초기화 위해서는 super() 실행이 필요하다.
    this.is_downloadable = is_downloadable;
    // 수퍼(부모) 클래스의 protected 속성은 접근 가능
    console.log(this.paper_type);
    // [오류] 수퍼 클래스의 private 속성은 접근 불가능(아래)
    // console.log(this._plant);
  }
}
/* 서브(자식) 인스턴스=객체 생성 ------------------------------------------------ */
let eBookInfo = new E_Book('홍길동전', '허균', 300, true);
console.log(eBookInfo); // Object 객체 출력
#4) 겟터-getter, 셋터-setter 함수사용 : get, set 키워드(예약어) 사용.
- 클래스 외부에서 프라이빗 변수에 직접 접근하는 것 처럼 사용할 수 있다.
- 상단의 TS코드에서 Book클래스 소스 아래에 코드 추가(아래)
//...이전코드 생략...
/* private변수에 get, set 키워드를 사용한 public 함수 시작:1개의 함수명으로 출력과 입력 처리가 가능(아래)------- */
  get plant(): string {
    return this._plant;
  } //클래스 외부에서 프라이빗 변수에 직접 접근하는 것 처럼 사용할 수 있다.
  set plant(value: string) {
    let search = '서울 지방 제주'; // 아래 includes함수로 문자열이 포함되었는지 비교 할 수 있다.
    if (search.includes(value) && value.length !== 0)
      this._plant = value + ' 공장';
  }
} //Book 클래스 End
/* 인스턴스=객체 생성 ------------------------------------------------ */
let bookInfo = new Book('홍길동전', '허균', 300);
/* get, set 함수 사용(아래) */
bookInfo.plant = '제주'; // 뉴욕과 제주를 번갈아 입력해 본다. set 함수가 자동으로 실행
console.log(bookInfo.plant); // get 함수가 자동으로 실행. 프라이빗 변수에 직접 접근하는 것 처럼 보인다.
console.log(bookInfo); // Object 객체 출력
//...이후코드 생략...
- 위 TS코드에서 제주부분 뉴욕으로 변경해서 콘솔화면의 변화를 확인해 보세요(아래 노란색 박스부분)
#5) 클래스를 new 키워드로 객체 생성 없이 바로 접근해서 사용할 수 있는 static 키워드 사용
- 프로그램 실행 과정 : CPU(처리명령) <-> Memory(static/heap실행영역) <-> Disk(하드디스크 프로그램소스/저장영역)
- 클래스를 통해 인스턴스(객체)를 생성할 필요 없이, 클래스의 속성 또는 메서드(함수)를 사용하고자 한다면 static 키워드를 사용해 속성, 메서드를 정의한다.
- 참고로 static 변수/메서드 VS new 클래스(Dynamic)에 대해서 정리하자면, static 키워드를 사용하면, 컴파일 시 바로 스택(stack) 고정메모리 영역에 올라가 실행가능한 상태가 되고, new 키워드를 사용하면, 사용할 때(runtime시)만 힙(Heap) 동적메모리 영역에 올라가 실행 가능해 진다.
즉, 프로그램이 최초 실행 될 때 static 메모리 영역을 많이 사용하면 실행이 종료되어도 영역을 비우지 않기 때문에 시스템에 부하가 가해진다. 반면, 힙(Heap) 메모리 영역은 동적메모리 영역으로 말 그대로 실행할 때만 메모리를 사용하고, 실행이 종료 되면, 영역을 비우기 때문에 메모리 관리가(Gavage Memory)되며 시스템이 가벼워진다.
- static(정적) 속성변수/ static(정적) 메서드사용 실습 소스(아래)
- 스택비즈의 TS 로 실습한다 https://stackblitz.com/fork/typescript (아래)
// Import stylesheets
import './style.css';
class Mathmatics {
  // 스태틱 속성
  static PI: number = Math.PI; // Math클래스의 PI 변수(상수)도 static정적 이기 때문에 객체생성 없이 바로 사용가능하다.
  // 스태틱 메서드
  static calcCircleLine(radius: number): number {
    // 둘레(원주)
    return this.PI * radius * 2;
  }
  static calcCircleWidth(radius: number): number {
    // 넓이(원)
    return this.PI * Math.pow(radius, 2); // 제곱승을 구하는 pow 함수사용
  }
}
// radius = 반지름
let radius = 4;
console.log('PI(원주율) = ', Mathmatics.PI); // 정적 클래스 변수에 직접 접근이 가능하다.
// 정적 클래스 함수를 직접 실행 가능하다. 파이기호는 키보드 ㅎ , 한자 키를 순서대로 누르면 보인다.
console.log(
  `반지름이 ${radius}인 원의 넓이: πr^2 = `,
  Mathmatics.calcCircleWidth(radius)
);
console.log(
  `반지름이 ${radius}인 원의 둘레: 2πr = `,
  Mathmatics.calcCircleLine(radius)
);
// Write TypeScript code!
const appDiv: HTMLElement = document.getElementById('app');
appDiv.innerHTML = `<h1>TypeScript Starter</h1>`;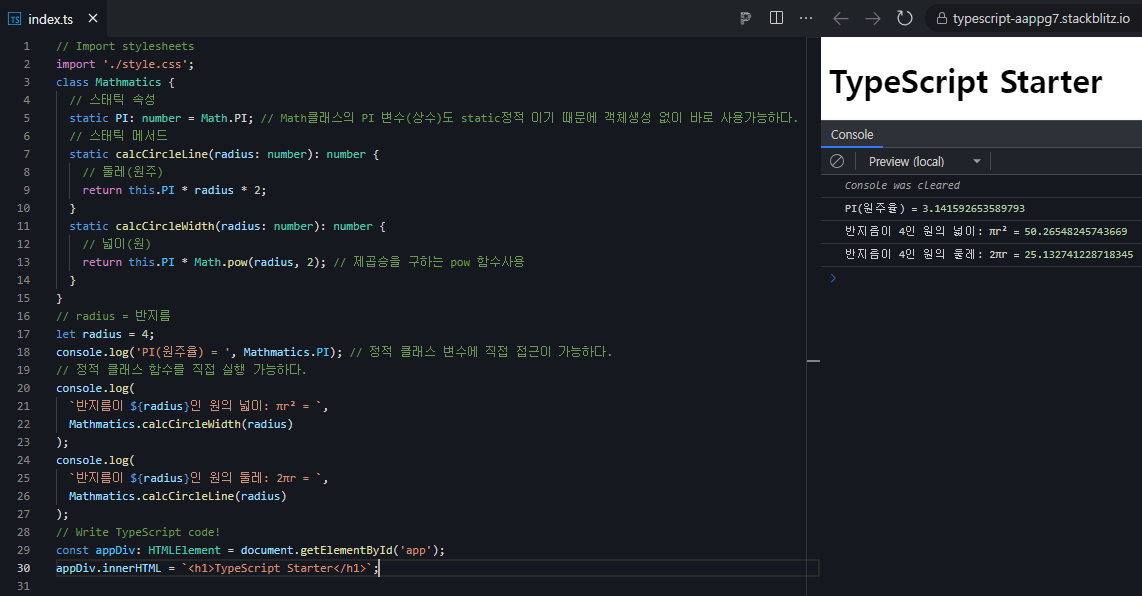
--------------------------------------------------------------------------------------------------------------------
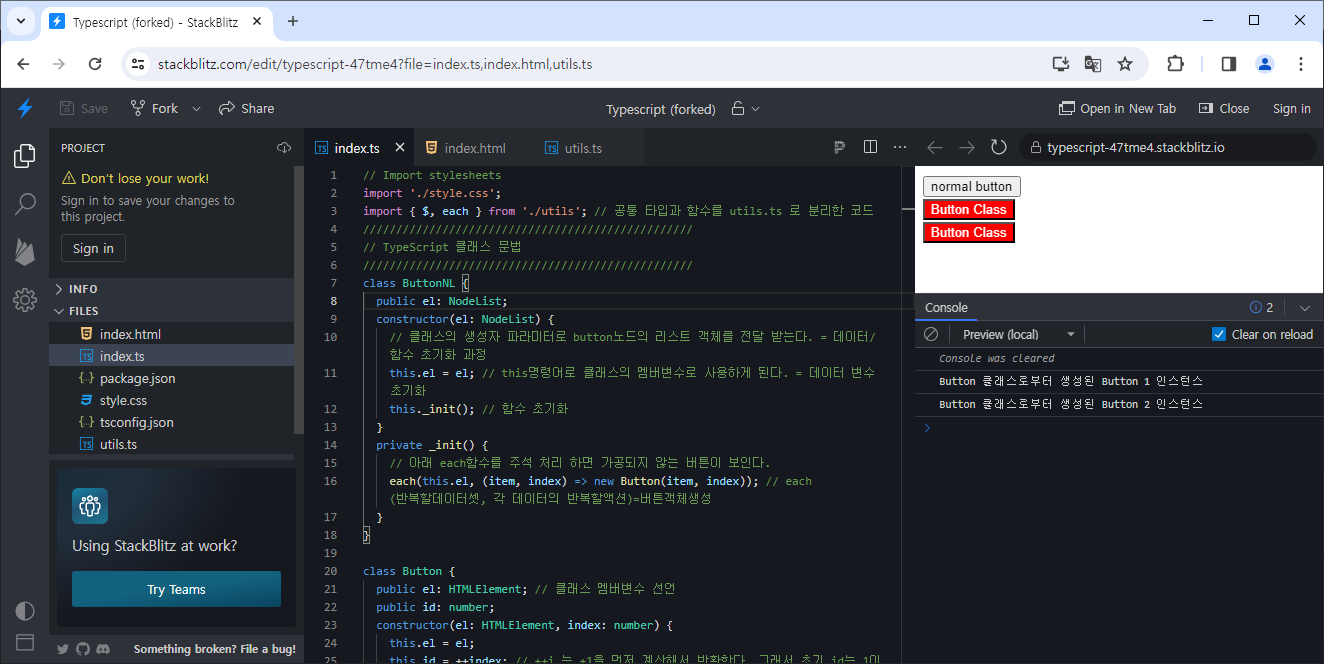
2. TypeScript: Class : 스택비즈의 TS 로 실습한다 https://stackblitz.com/fork/typescript
--------------------------------------------------------------------------------------------------------------------
- TypeScript의 클래스는 ES6의 클래스 문법을 지원하면서 타입 기능을 제공한다.(아래)
// Import stylesheets
import './style.css';
// import { $, each } from './utils';
//////////////////////////////////////////////////
// 공통 타입과 함수는 위 처럼 ./utils.ts 로 분리할 수 있다. 수업에서는 편의상 1곳에서 처리한다.
//////////////////////////////////////////////////
type array_like_obj = {
  length: number;
  [prop: string]: any;
};
function $(s: string): NodeList {
  // html 클래스네임이 button 인 모든 객체를 반환한다.
  return document.querySelectorAll(s);
}
function each(o: array_like_obj, cb: (item: any, index: number) => void): void {
  Array.prototype.forEach.call(o, cb); // cb는 CallBack 함수의 약자로 사용
}
//////////////////////////////////////////////////
// TypeScript 클래스 문법
//////////////////////////////////////////////////
class ButtonNL {
  public el: NodeList;
  constructor(el: NodeList) {
    // 클래스의 생성자 파라미터로 button노드의 리스트 객체를 전달 받는다. = 데이터/함수 초기화 과정
    this.el = el; // this명령어로 클래스의 멤버변수로 사용하게 된다. = 데이터 변수 초기화
    this._init(); // 함수 초기화
  }
  private _init() {
    // 아래 each함수를 주석 처리 하면 가공되지 않는 버튼이 보인다.
    each(this.el, (item, index) => new Button(item, index)); // each(반복할데이터셋, 각 데이터의 반복할액션)=버튼객체생성
  }
}

class Button {
  public el: HTMLElement; // 클래스 멤버변수 선언
  public id: number;
  constructor(el: HTMLElement, index: number) {
    this.el = el;
    this.id = ++index; // ++i 는 +1을 먼저 계산해서 반환한다. 그래서 초기 id는 1이 된다.
    this._init(); // 함수 초기화
  }
  private _init(): void {
    this._styling();
    this._bind();
  }
  private _styling(): void {
    // 여러줄에서 백틱 기호 사용 = `여러줄`
    this.el.style.cssText = `
      background: red;
      color: white;
    `;
  }
  private _bind(): void {
    this.el.addEventListener('click', (e) => {
      console.log(`Button 클래스로부터 생성된 Button ${this.id} 인스턴스`);
    });
  }
}
let buttons = new ButtonNL($('.button')); //버튼 노드리스트 객체 생성
// Write TypeScript code! 초기 값을 주석 처리하고 index.html에 버튼을 3개 추가한다.(아래 추가코드)
//const appDiv: HTMLElement = document.getElementById('app');
//appDiv.innerHTML = `<h1>TypeScript Starter</h1>`;
- index.html 에 버튼 3개를 추가한 코드(아래)
<div id="app">
  <div class="item">
    <button type="button">normal button</button>
  </div>
  <div class="item">
    <button type="button" class="button">Button Class</button>
  </div>
  <div class="item">
    <button type="button" class="button">Button Class</button>
  </div>
</div>
- 참고로 위 공통 타입과 함수를 utils.ts 로 분리한 코드는 아래와 같다.(아래)
type array_like_obj = {
  length: number;
  [prop: string]: any;
};

export function $(s: string): NodeList {
  return document.querySelectorAll(s);
}

export function each(
  o: array_like_obj,
  cb: (item: any, index: number) => void
): void {
  Array.prototype.forEach.call(o, cb);
}
- 위 TS 타입스크립트 코드 작업결과: 버튼을 클릭하면 콘솔에 액션결과가 보인다.(아래)
-------------------------------------------------------------------------------------------------------------------------------
3. 리액트+TypeScript: Class : 코드샌드박스의 React TS 로 실습한다 https://codesandbox.io/s/react-typescript-react-ts
-------------------------------------------------------------------------------------------------------------------------------
- 다른 코드는 위와 동일하고, index.html에 버튼추가 대신 tsx(TypeScript+XML)에 코드를 사용한 점이 차이점이다.(아래)
//...이전 코드동일 생략...
return (
    <div className="App">
      <h1>Hello CodeSandbox</h1>
      <h2>Start editing to see some magic happen!</h2>
      {/* 여기서 부터 jsx/tsx추가한 부분 시작 */}
      <div className="item">
        <button type="button">normal button</button>
      </div>
      <div className="item">
        <button type="button" className="button">
          Button Class
        </button>
      </div>
      <div className="item">
        <button type="button" className="button">
          Button Class
        </button>
      </div>
      {/* 여기서 부터 jsx/tsx추가한 부분 끝 */}
    </div>
  );
  }
- 위 리액트-TS 에서 실행한 결과 : 실행은 되지만 eslint 코드오류검사에서 2곳의 문제가 보인다. 해결해 본다.(아래)
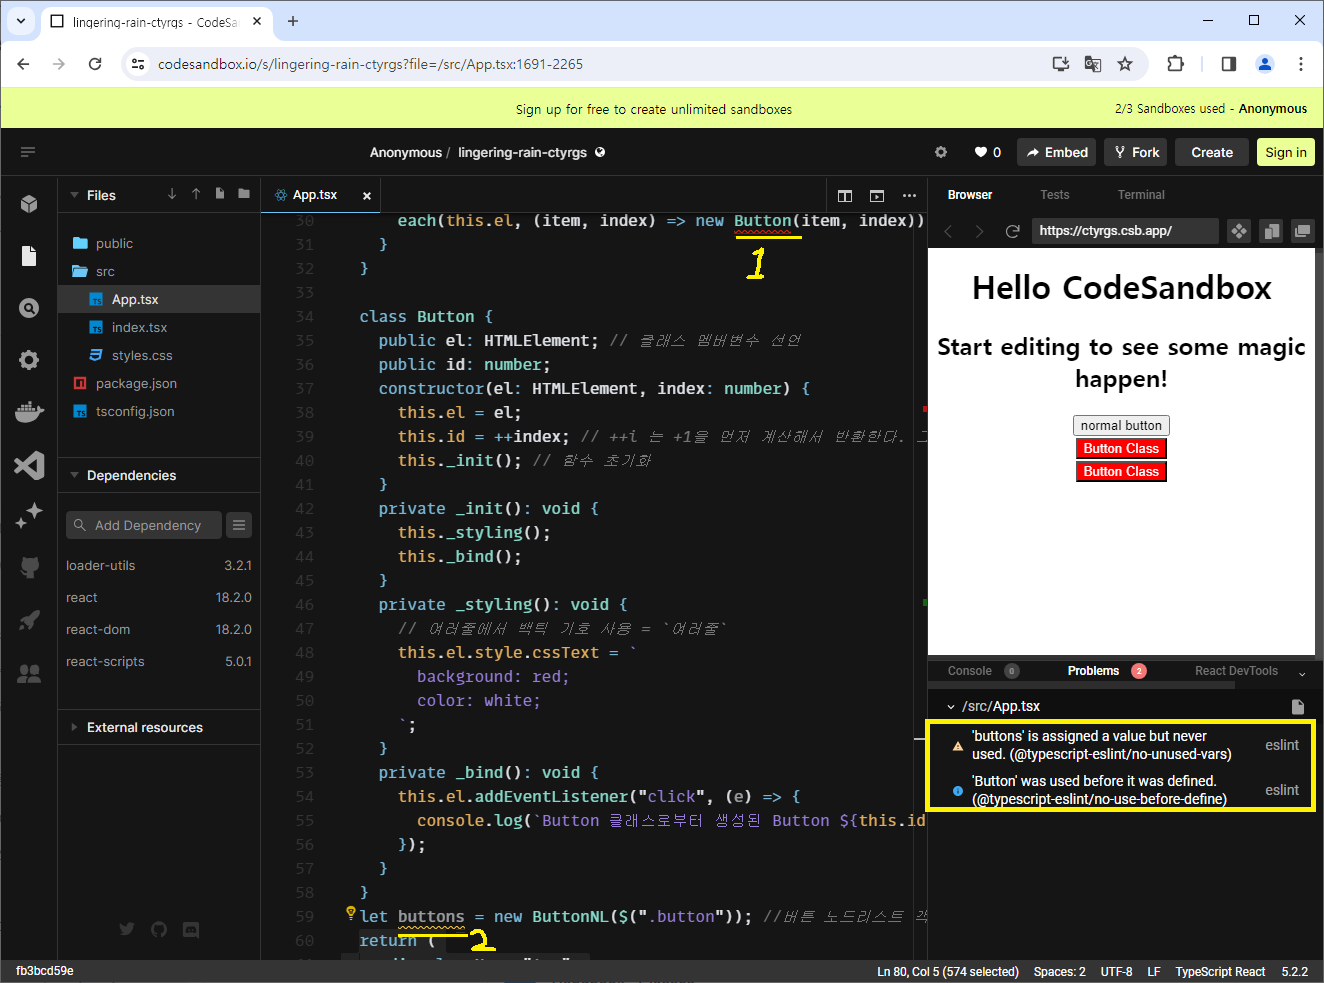
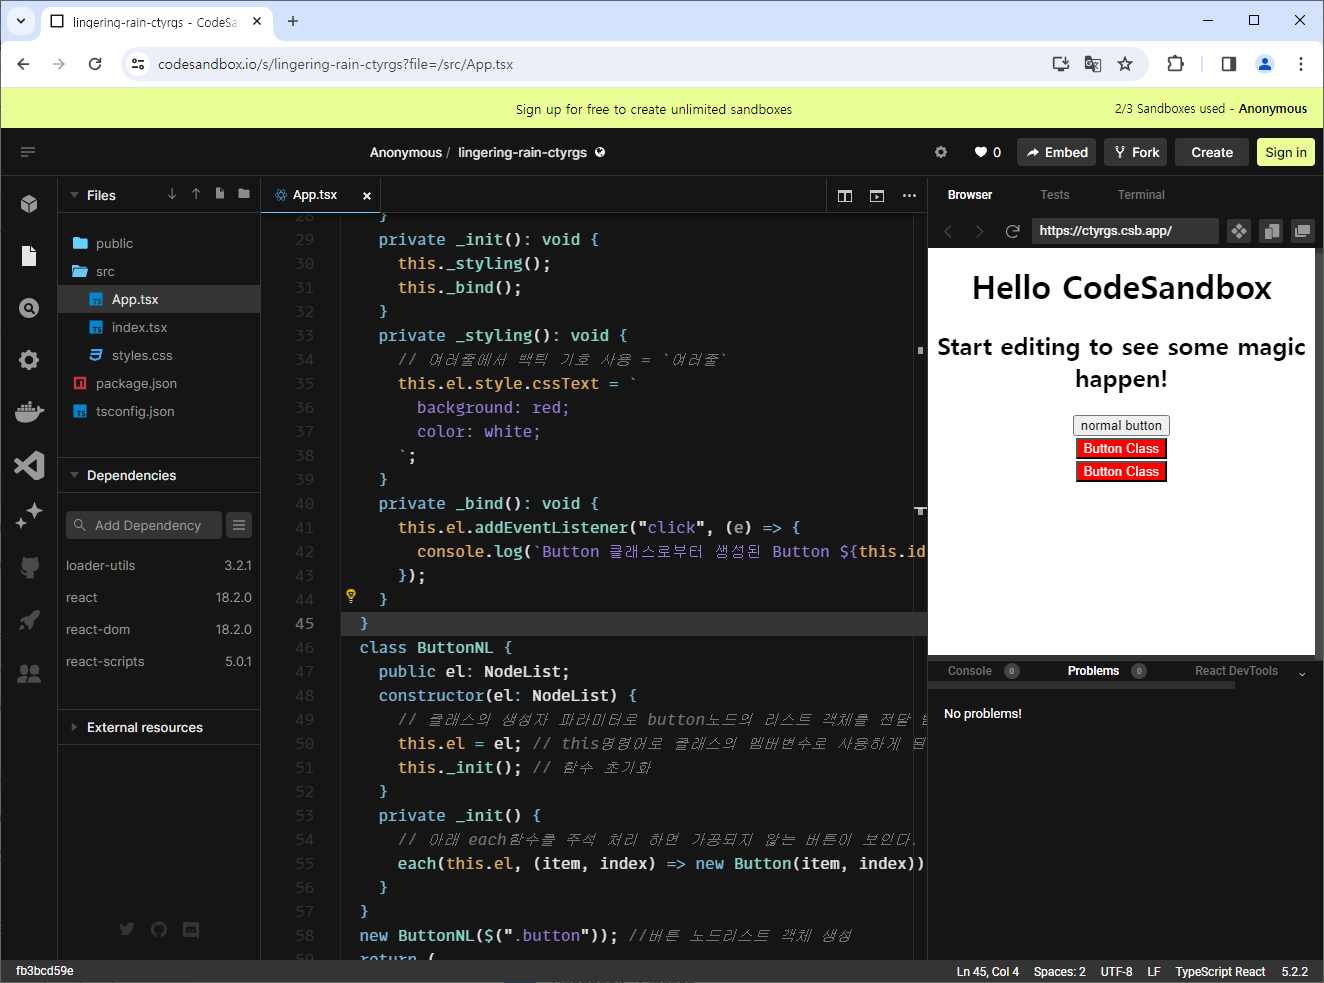
- 위 2가지 eslint 검사를 통과한 결과 : 사용되지 않는 buttons 변수 제거 및 Button 클래스를 new Button()보다 상위에 배치(아래)
-----------------------------------------------------------------------------------------------------------------------------------------------
4. 추상 Class vs 인터페이스 : 비슷하지만, 보통은 인터페이스를 사용한 컴포넌트화면 구현을 자주보게 된다.
-----------------------------------------------------------------------------------------------------------------------------------------------
#1) 추상 클래스 : 추상 클래스를 정의할 때는 class 앞에 abstract라고 선언한다. 또한 추상 메서드(함수)를 정의할 때도 abstract를 메서드 이름 앞에 붙인다. 추상 메서드는 함수명(정의)만 있을 뿐 {실행코드...}(body)가 구현되어 있지 않는다. 실행코드는 추상 클래스를 상속한 클래스에서 해당 추상 메소드를 재 정의하여 구현해야 한다.
그리고 추상 클래스는 추상 메서드 뿐만 아니라, 사용이 가능한 구현코드가 있는 메서드도 정의할 수 있다.(참고로 인터페이스는 구현내용 보다는 주로 복잡한 입출력의 명세를 단순하게 사용하도록 하는데 목적이 있다.)
추상 클래스를 상속한 클래스를 통해 new 키워드로 생성된 인스턴스(객체)로 이 메서드를 사용할 수 있다. 단, 추상 클래스는 상속한 클래스와 달리 인스턴스(객체)를 생성하지 않는다. 생성 구문을 사용하면 오류가 발생한다.
- 스택비즈의 TS 로 실습한다 https://stackblitz.com/fork/typescript (아래)
// Import stylesheets
import './style.css';
// 추상 클래스
abstract class Product {
  public product_name: string | null = null;
  private price: number = 2000000000; // 금액
  // 추상 메서드 정의 : 메서명만 있고, 구현 내용은 없다.(아래)
  public abstract changeProductName(name: string): void;
  // 실제 메서드 정의 : 상품수량 별 금액계산(아래)
  public calcPrice(ea: number = 1): number {
    return this.price * ea;
  }
}
// [오류] 추상 클래스의 인스턴스는 만들 수 없다.
//let new_product = new Product();
// 주문-자식클래스 <= 상품-추상클래스 상속
class Order extends Product {
  public changeProductName(name: string): void {
    this.product_name = name;
    //throw new Error('Method not implemented.');
  }
  // [오류] Order 클래스에서 부모클래스의 추상 멤버 'changeProductName'을(를) 구현하지 않았다.
  // 오류해결: 반드시 상속받은 구현 메서드를 만들어야 한다.
}
/* 인스턴스 생성 : 추상클래스X, 자식클래스O -------------------------- */
let new_order = new Order();
console.log(new_order.product_name); // null
new_order.changeProductName('인공지능 CPU');
console.log(new_order.product_name); // '인공지능 CPU'
// Write TypeScript code!
const appDiv: HTMLElement = document.getElementById('app');
appDiv.innerHTML = `<h1>TypeScript Starter</h1>`;
#2) 인터페이스 : 인터페이스는 클래스와 비슷한데, 클래스와 달리 정의만 할 뿐 실제 구현되지 않습니다. 즉, 어떠한 객체를 생성 했을 때 가져야 할 속성 또는 메서드를 정의한다고 보면 된다. 추상클래스와 비슷하지만, 클래스를 확장할 때 extends 대신 implements 키워드를 사용. 단, implements 사용보다는 주로 아래 처럼 변수또는 함수 구현에 사용한다.
- 변수 구조에 인터페이스를 사용하는 코드실습-스택비즈의 TS 로 실습한다 https://stackblitz.com/fork/typescript (아래)
// Import stylesheets
import './style.css';
// Hero 인터페이스에서 다음 속성, 메서드를 제외하고는 모두 옵션으로 설정해야 에러가 발생하지 않는다.
// - superhero, publisher, superPower()
//import Hero from './interfaces/Hero'; //문제 아래 Hero 인터페이스를 외부 파일로 저장해 보세요
/** 01. 코믹스의 Hero를 데이터화하는 예상 구조.(아래)
let wonderWoman = {
  superhero: '원더우먼',
  publisher: 'DC 코믹스',
  characters: '갤가돗, 등등',
};
*/
// 02. 위 데이터구조를 인터페이스 Hero 타입으로 정의.(아래)
interface Hero {
  // 필수
  superhero: string; // 히어로 명
  publisher: string; // 코믹 출판사 명
  // 옵션? 는 빈 값을 허용하겠다는 기호이다. 즉, 구현할 때 구현코드가 없어도 된다.
  characters?: string; // 출연 배우들 명
  // 함수: 인터페이스를 구현할 때 필수로 실행코드가 있어야 한다.
  onInit?(param?: string): void; // 변수 값 초기화 함수
  // 메서드 옵션? 인터페이스를 구현할 때 선택적으로 사용할 수 있다. 구현코드가 없어도 된다.
  superPower(gage: number): string; //함수의 파라미터는 number형 반환값이 string타입인 함수는 옵션
}
// 03. 위 Hero 인터페이스를 이용하여 값을 입력(아래)
let wonderWoman: Hero = {
  superhero: '원더우면',
  publisher: 'DC 코믹스',
  superPower(gage: number): string {
    return `${this.superhero} 수퍼파워! 파워 게이지 ${gage}`;
  },
};
let ironMan: Hero = {
  superhero: '아이언맨',
  publisher: 'Marvel 코믹스',
  characters: '출연진 구성중',
  onInit(param?: string) {
    this.characters = param ? param : this.characters;
  },
  superPower(gage: number): string {
    return `${this.superhero} 수퍼파워! 파워 게이지 ${gage}`;
  },
};
console.log(wonderWoman, wonderWoman.superPower(200));
console.log(
  ironMan,
  //ironMan.onInit(),
  ironMan.onInit('로버트 다우니 주니어, 등등'),
  ironMan.superPower(200)
);
// Write TypeScript code!
const appDiv: HTMLElement = document.getElementById('app');
appDiv.innerHTML = `<h1>TypeScript Starter</h1>`;
- 메서드 함수의 파라미터에 인터페이스를 사용하는 코드실습 : 참고로 인터페이스는 구현내용 보다는 주로 복잡한 입출력의 명세를 단순하게 사용하도록 하는데 목적이 있다. ( 코드샌드박스의 React TS 로 실습 - 아래)
import "./styles.css";
//import Button from "./components/CustomButtonComponent"; // 아래코드를 tsx파일로 만들어 보세요
/////////////////////////////////////////////////////
// 인터페이스를 속성(Properties)으로 사용한 화면(버튼) 구현
/////////////////////////////////////////////////////
interface Props {
border: string; // 컴포넌트 테두리
color: string; // 컴포넌트 색상
contexts?: React.ReactNode; // 내부의 내용
height: string; // 높이
onClick: () => void; // 클릭 이벤트
radius: string; // 테두리 라운드
width: string; // 너비
cursor: string; // 마우스 포인터 모양
}
// React.FuntionComponent 함수에 인터페이스를 파라미터로 버튼 객체를 만들 수 있다.(아래)
const Button: React.FC<Props> = ({
border,
color,
contexts,
height,
onClick,
radius,
width,
cursor
}) => {
return (
<button
onClick={onClick}
style={{
backgroundColor: color,
border,
borderRadius: radius,
height,
width,
cursor: cursor //원래는 이런 모양 속성과 변수가 같으면 생략가능하다.
}}
>
{contexts}
</button>
);
};
export default function App() {
return (
<div className="App">
<h1>Hello CodeSandbox</h1>
<h2>Start editing to see some magic happen!</h2>
{/* 여기서 부터 jsx/tsx추가한 부분 시작 */}
<Button
border="solid red 12px"
color="pink"
height="200px"
onClick={() => console.log("클릭 하였습니다!")}
radius="50%"
width="200px"
contexts="여기를 클릭 하세요!"
cursor="pointer"
/>
{/* 여기서 부터 jsx/tsx추가한 부분 끝 */}
</div>
);
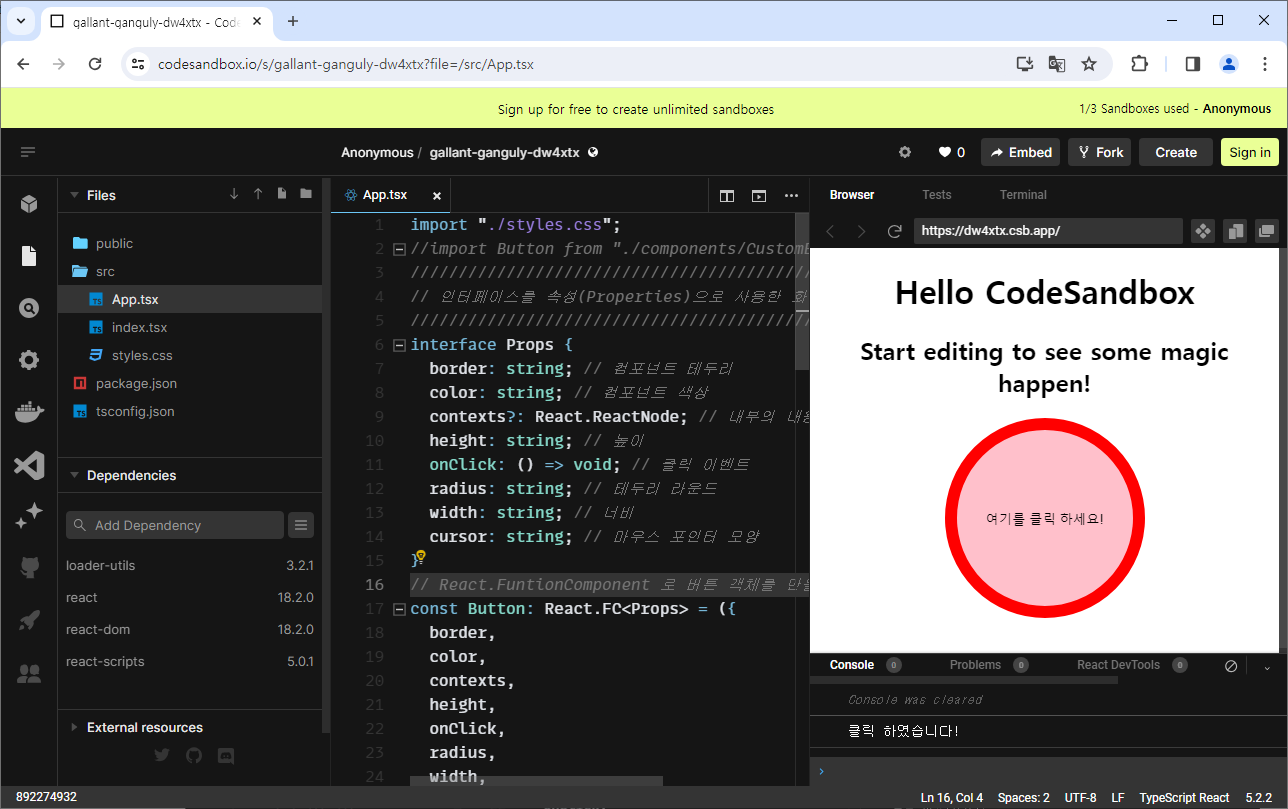
}- 위 소스를 실행한 결과 : 코드샌드박스의 React TS 로 실습한다 https://codesandbox.io/s/react-typescript-react-ts
- Ps. 기술참조 : https://yamoo9.gitbook.io/typescript/
'노드js·자바스크립트' 카테고리의 다른 글
| [리액트+TS] vs [HTML+JS] 에서 외부 라이브러리/모듈 사용비교 (1) | 2023.11.08 |
|---|---|
| TS-타입스크립트 확장 코딩 패턴 (0) | 2023.11.02 |
| 기존 JS vs TypeScript(ES6+TS) 비교 (0) | 2023.10.20 |
| 타입스크립트-TypeScript 전용 타입에 대해서 (0) | 2023.10.14 |
| TypeScript-타입스크립트의 특징 (1) | 2023.10.03 |


댓글 영역